Zoë MacDonald is E-Commerce and Social Media
Manager at Canada’s largest manufacturer and wholesale distributor of quality
sewing, quilting, and knitting supplies. Crafty lady and recent quilting
convert, she is keen to share her love for the latest in notions.
It’s simply the most practical way to take your quilt with
you – and who wouldn’t want that? A few thoughts to keep handy for your next
one.
1. You’ll want your pattern pieces
to be big enough to support miniature quilts and to show off the piecing. A
simple pattern will also help reduce the number of (thick) intersecting seams
and help to reduce bulk.
2. To give your bag some body, you will want to use an interfacing that is firm but flexible like the (aptly named) HeatnBond Firm & Flexible. Since it’s a bit thick to pin, you will want to adhere your pattern pieces with 202 before cutting them out with your rotary cutter.
Bonus: Once dry, pattern pieces will
regain their stickiness for later use when ironed.
3. Build mini quilt tops that will cover the surface of your
pattern pieces. For those interested in marking half-square triangles the quick
and easy way (Hi!) use a specialty gauge
designed for this purpose. Reheat pattern pieces to cut out from mini quilt top
and backing. Use numbered
pins to keep your rows in order when piecing and pressing until they are
assembled.
4. Though flexible, bag interfacing
is thick and can be hard to pin without distorting it. Use 505 instead
(from the middle outwards, on the fabric not the fuzzy stuff) between both
layers to secure your sandwich.
5. Choosing a geometrical quilt pattern will allow you to simply follow your piecing when finishing the quilting stitches – creating pretty and consistent shapes on the inside and out. For bold stitches, try a Sulky 12 weight thread (like I did, in Dusty Navy and Petal Pink) or 30 weight Cotton available in Solids and Blendables. With either, a 90 or 100 size Topstitch Needle will work best. (I would suggest treating yourself to a Schmetz Chrome Needle).
6. Your work should be on a pedestal. Add four or eight feet
(even twelve, for a large bag) to the bottom of your bag before quilting. An
extra piece of interfacing where the feet will be located will add stability
and extend the life of your bag.
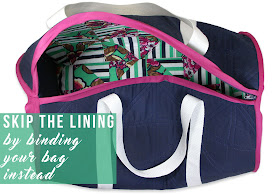
7. Show off the opposite side of your stitches by skipping the lining and binding the bag instead.
Confession: I used pre-made double fold binding. While I'm fully converted on the joys of making your own, I liked this colour so much that I didn't bother.
8. For putting your bag together and the initial binding
application (I would recommend doing this in two steps), binding clips are
perfect. However, when you are attaching
the binding overlap, Quilters’ Basting
Glue is best to achieve the precision you need. It can be tricky to match
up your binding at the best of times, but it is especially challenging when you
are working with layers of bag interfacing – around curves!
9. Thanks to the bag-making trend, there are a ton of options for pre-made and professional-looking bag handles. Simple webbing also works quite well and can be cut to any length. Of course, making your own straps can be fun, but these super strong and simple options let you get back to the quilting part sooner.
10. When your
barrel bag is filled to the brim, a longer strap will make carrying it more
manageable. It also gives you an excuse to add a little extra hardware like rings and swivel hooks and makes the bag much more versatile. (Don’t
forget to include a slider to make
the strap adjustable.)
Bonus tip! Go on
and buy a little extra fabric! Those bonus pieces will come in handy for inside
pockets, wallets, or pouches and are the perfect outlet for playing with
different patterns using the same mini blocks. Secure these to the inside of
your bag with swivel
hooks and rings.


No comments:
Post a Comment